2. Customizing the DocumentSetProperties Web Part
Before we can customize the
welcome page for our custom document set, we need to build a web part
with the following additional features:
A Build Sales Proposal button that creates and starts the compilation job
A status indicator that shows the progress of the compilation job
A link to the compiled output file
Although we could create a separate web part that
could be used in conjunction with the built-in
DocumentPropertiesWebPart, it wouldn’t be overly useful as a stand-alone
component elsewhere. Instead, we’ll create a web part that inherits
from the DocumentPropertiesWebPart and adds our required additional
functionality.
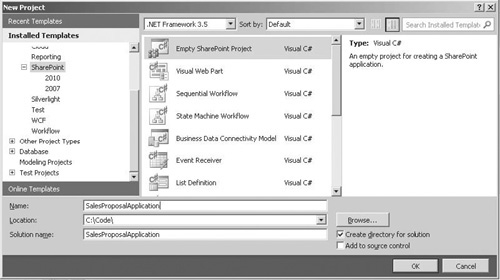
Using Visual Studio 2010, create a new Empty SharePoint Project named SalesProposalApplication, as shown:
Set
the debugging site to be the blank site that we created in the
preceding section, and select the Deploy As Farm Solution option. Click
Finish to create the project.
After the project has been created, add a new Visual Web Part named SalesProposalPropertiesWebPart.
Visual Web Parts provide a design surface when we’re creating web
parts. However, since we’re planning to override a built-in web part
that already has its own rendering logic, we need to change some of the
generated code for the Visual Web Part.
Add a reference to the Microsoft.Office.DocumentManagement assembly, located in the %SPROOT%isapi folder, to the project.
In the SalesProposalPropertiesWebPart.cs file, add the following code:
using System.ComponentModel;
using System.Web.UI;
using Microsoft.Office.Server.WebControls;

namespace SalesProposalApplication.SalesProposalPropertiesWebPart
{
  [ToolboxItemAttribute(false)]
  public class SalesProposalPropertiesWebPart : DocumentSetPropertiesWebPart
  {
    // Visual Studio might automatically update
    //this path when you change the Visual Web Part project item.
    private const string _ascxPath =
@"~/_CONTROLTEMPLATES/SalesProposalApplication/SalesProposalPropertiesWebPart/→
SalesProposalPropertiesWebPartUserControl.ascx";

    protected override void CreateChildControls()
    {
      Control control = this.Page.LoadControl(_ascxPath);
      this.Controls.Add(control);
      base.CreateChildControls();
    }

    protected override void RenderWebPart(HtmlTextWriter writer)
    {
      base.RenderWebPart(writer);
      this.Controls[0].RenderControl(writer);
    }
  }
}
Tip
When overriding any built-in SharePoint classes, it
can be challenging to work out exactly what you need to do to get the
behavior that you expect. In the code snippet, to get our web part to
render properly, we explicitly need to render our custom user control by
overriding RenderWebPart method. Uncovering details such as this from
the documentation is often impossible, and this is where Reflector Pro, is invaluable.
With our custom user control properly hooked up to
our web part, we can implement the rest of our custom logic via the user
control.
We’ll
make use of Asynchronous JavaScript and XML (AJAX) so that the web part
can periodically check on the status of the timer job and redraw the
controls. Add an UpdatePanel control to the
SalesProposalPropertiesWebPartUserControl.ascx file.
We’ll
use an AJAX Timer so that we can automatically refresh the status
indicator on our control. Drag the Timer control from the toolbox onto
the user control design surface. Name the Timer RefreshTimer and set its
Enabled property to False.
From
the toolbox, add a Label control, a Hyperlink control, and a Button
control to the SalesProposalPropertiesWebPartUserControl.ascx file.
Within the UpdatePanel control markup, lay out and rename the controls
as follows:
<asp:UpdatePanel runat="server">
    <ContentTemplate>
        <div width="100%">
            <br />
            <asp:Label ID="StatusLabel" runat="server" Text=""></asp:Label>
            <br />
            <asp:HyperLink ID="OutputHyperlink" runat="server">
                 Click here to download a compiled copy</asp:HyperLink>
            <br />
            <asp:Button ID="StartCompilation" OnClick="StartCompilation_Click"
                        runat="server" Text="Start Compilation" />
        </div>
    </ContentTemplate>
    <Triggers>
      <asp:AsyncPostBackTrigger ControlID="RefreshTimer" EventName="Tick" />
    </Triggers>
</asp:UpdatePanel>
<asp:Timer runat="server" ID="RefreshTimer" Enabled="False">
</asp:Timer>
In the code-behind file (SalesProposalPropertiesWebPartUserControl.aspx.cs), add the following code:
public partial class SalesProposalPropertiesWebPartUserControl : UserControl
{
  protected void Page_Load(object sender, EventArgs e)
  {
    RedrawUI();
  }

  private void RedrawUI()
  {
    if (SPContext.Current.ListItem != null)
    {
      string ConversionJobId =
             SPContext.Current.ListItem.GetFormattedValue("JobId");

      if (!string.IsNullOrEmpty(ConversionJobId))
      {

        OutputHyperlink.NavigateUrl =
                    SPContext.Current.RootFolderUrl + "/temp.pdf";

        SPJobHistory history = (from j in
                          SPFarm.Local.TimerService.JobHistoryEntries
                          where j.JobDefinitionId.ToString() == ConversionJobId
                                orderby j.StartTime descending
                                select →
                               ).FirstOrDefault();

      if (history != null)
      {
        StatusLabel.Text = history.Status.ToString();
        if (history.Status == SPRunningJobStatus.Succeeded)
        {
          OutputHyperlink.Visible = true;
          StartCompilation.Enabled = true;
          RefreshTimer.Enabled = false;
        }
        else if (history.Status == SPRunningJobStatus.Failed |
                   history.Status == SPRunningJobStatus.Aborted)
        {
          OutputHyperlink.Visible = false;
          StartCompilation.Enabled = true;
          RefreshTimer.Enabled = false;
        }
        else
        {
          OutputHyperlink.Visible = false;
          StartCompilation.Enabled = false;
          RefreshTimer.Enabled = true;
        }
      }
      else
      {
        StatusLabel.Text = "Processing";
        OutputHyperlink.Visible = false;
        StartCompilation.Enabled = false;
        RefreshTimer.Enabled = true;
      }
    }
  }
  else
  {
    OutputHyperlink.NavigateUrl = "#";
    OutputHyperlink.Visible = true;
    StatusLabel.Text = "My Status";
    StartCompilation.Enabled = false;
  }
}
protected void StartCompilation_Click(object sender, EventArgs e)
{
  throw new NotImplementedException();
}
Before our customized web part can be deployed, we
need to make a few changes to the solution. The default packaging
mechanisms that are set up in Visual Studio work well for creating web
parts that are derived directly from System.Web.UI.WebControls.Webparts.
Webpart. However, when creating a web part that’s derived from another
base class, we’ll occasionally see an “Incompatible Web Part Markup”
error message when we’re trying to use the deployed web part on a page. To resolve this error, we need to use an alternative packaging format.
Rename the SalesProposalPropertiesWebPart.webpart file to SalesProposalPropertiesWebPart.dwp.
Replace the contents with the following XML:
<WebPart xmlns="http://schemas.microsoft.com/WebPart/v2">
<Assembly>
$SharePoint.Project.AssemblyFullName$
</Assembly>
  <TypeName>
SalesProposalApplication.SalesProposalPropertiesWebPart.SalesProposalPropertiesWebPart→
</TypeName>
  <Title>SalesProposalPropertiesWebPart</Title>
  <Description>Web Part Description</Description>
</WebPart>
So
that the renamed file is installed properly, edit the Elements.xml file
in the SalesProposalPropertiesWebPart folder as follows:
<?xml version="1.0" encoding="utf-8"?>
<Elements xmlns="http://schemas.microsoft.com/sharepoint/" >
  <Module Name="SalesProposalPropertiesWebPart" List="113"
          Url="_catalogs/wp">
    <File Path="SalesProposalPropertiesWebPart\SalesProposalPropertiesWebPart.dwp"
          Url="SalesProposalPropertiesWebPart.dwp"
          Type="GhostableInLibrary" >
      <Property Name="Group" Value="Custom" />
    </File>
  </Module>
</Elements>